Specialized Stumpjumper Expert
Specifications
Seat BinderAlloy, 38.6mm
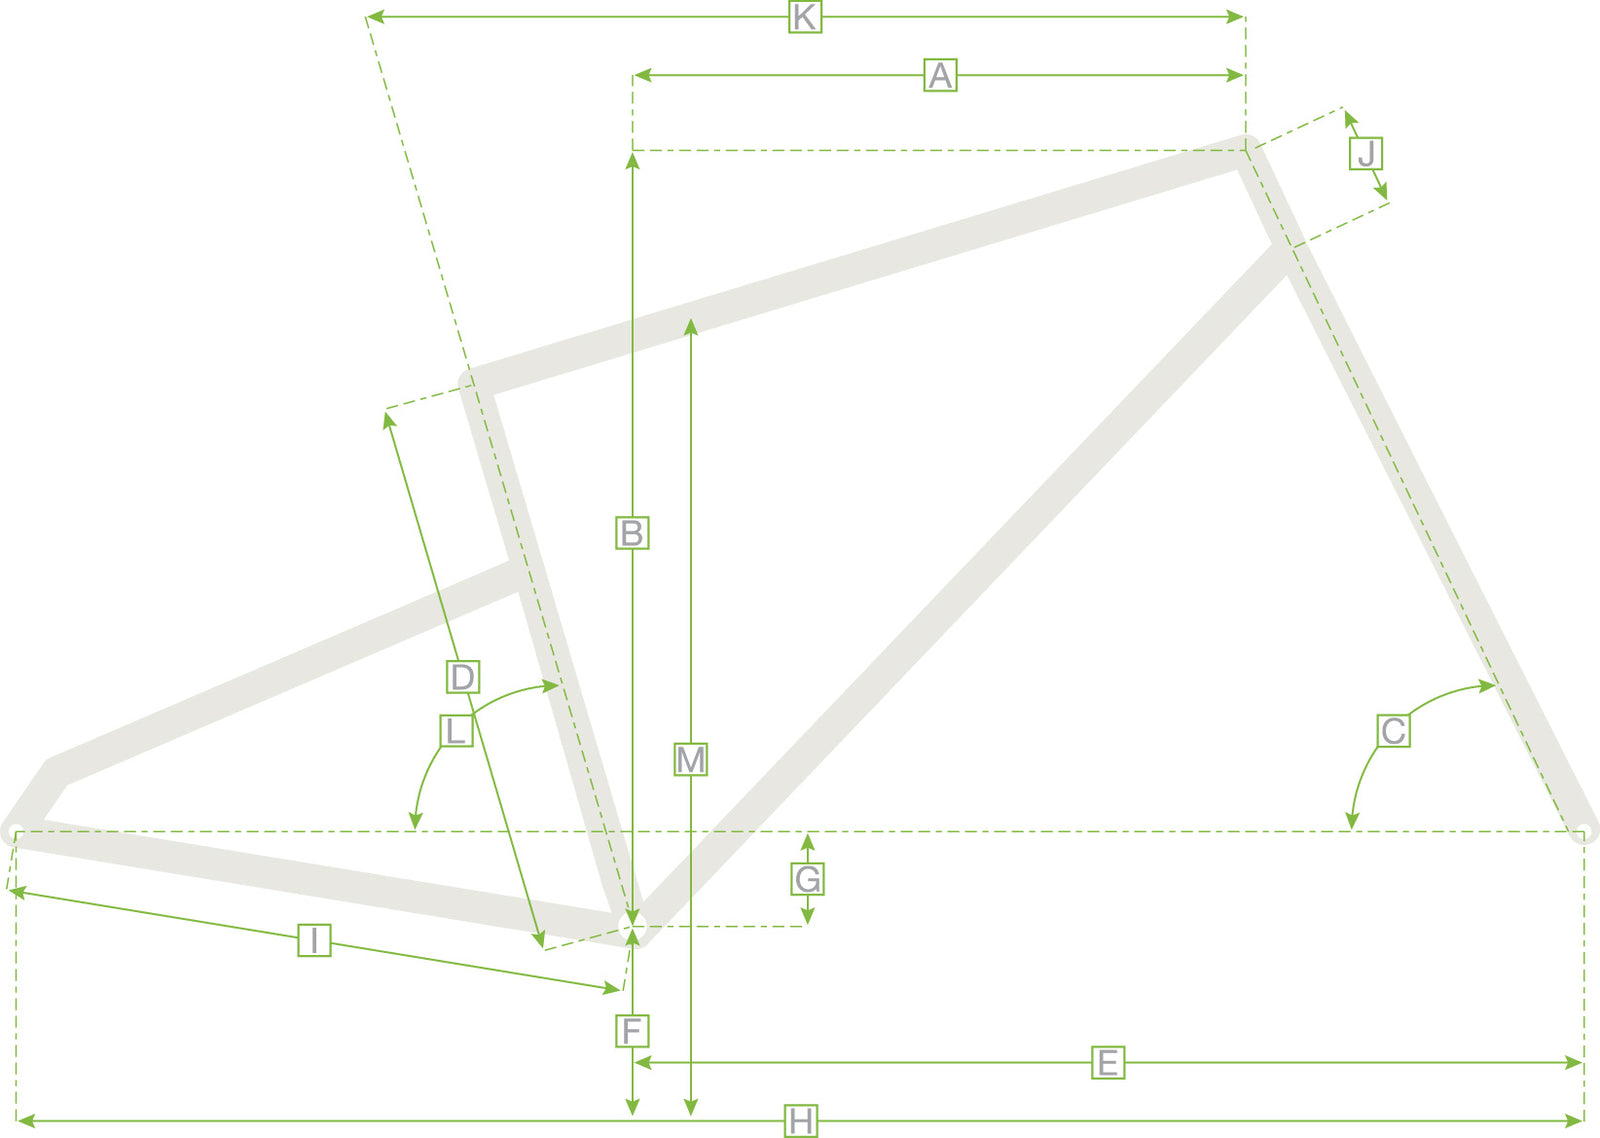
FrameFACT 11m carbon chassis and rear-end, asymmetrical design, SWAT™ Door integration, 130mm of travel
ForkFOX FLOAT 34 Performance Elite, GRIP2 damper, 15x110mm, 44mm offset, 140mm of travel
Rear ShockFOX FLOAT DPS Performance Elite, Rx Trail Tune, EVOL Air sleeve, 3-position adjustment w/ Open Mode Adjustment, 190x45mm
StemAlloy Trail Stem, 35mm bar bore
SaddleBridge Comp, Hollow Cr-mo rails, 155/143mm
GripsDeity Grips
SeatPostOneUp, Dropper Post-V2, MMX lever, 34.9 (S1:120mm, S2/S3:150mm, S4: 180mm, S5/S6: 210mm)
HandlebarsSpecialized Trail, 7050 alloy, 8-degree backsweep, 6-degree upsweep, 30mm rise, 800mm, 35mm clamp
Rear BrakeSRAM G2 RSC, 4-piston caliper, hydraulic disc, 180mm
Front BrakeSRAM G2 RSC, 4-piston caliper, hydraulic disc, 200mm
Bottom BracketSRAM DUB, BSA 73mm, Threaded
Shift LeversSRAM GX Eagle AXS Controller
Rear DerailleurSRAM GX Eagle AXS, w/ battery cover
CranksetSRAM GX Eagle Alloy, DUB, 165/170/175mm, 32t
ChainSRAM GX Eagle, 12-speed
CassetteSram XG-1275, 12-speed, 10-52t
ChainringsSteel, 30T
Wheels
Front TireButcher, GRID casing, GRIPTON® T7 compound, 29x2.3"
SpokesDT Swiss Competition Race
Rear TirePurgatory, GRID casing, GRIPTON® T7 compound, 29x2.3"
Rear HubRoval DT Swiss 370, Ratchet LN, SRAM XD driver body, 12mm thru-axle, 148mm spacing, 28h
RimsRoval Traverse 29 Alloy, 30mm inner width, hand-built, 2Bliss Ready
Front HubRoval, sealed cartridge bearings, 15x110mm spacing, 28h
Inner Tubesubes standard 48mm PV Low lead 29x1.75/2.4, Maxxis Brand
Geometry

S1 | S2 | S3 | S4 | S5 | S6 | ||
---|---|---|---|---|---|---|---|
hi/lo | hi/lo | hi/lo | hi/lo | hi/lo | hi/lo | ||
A | Reach | 415|410 | 435|430 | 455|450 | 480|475 | 505|500 | 535|530 |
B | Stack | 610|614 | 609|613 | 618|622 | 627|632 | 636|641 | 646|650 |
C | Headtube Angle | 65.5°|65° | 65.5°|65° | 65.5°|65° | 65.5°|65° | 65.5°|65° | 65.5°|65° |
D | Seat Tube Length | 385 | 385 | 405 | 425 | 445 | 465 |
E | Front Center | 724 | 746 | 770 | 800 | 829 | 863 |
F | Bottom Bracket Height | 335|328 | 340|333 | 340|333 | 340|333 | 340|333 | 340|333 |
G | Bottom Bracket Drop | 40|47 | 35|42 | 35|42 | 35|42 | 35|42 | 35|42 |
H | Wheelbase | 1152 | 1175 | 1200 | 1228 | 1268 | 1302 |
I | Chainstay Length | 432 | 432 | 432 | 432 | 442 | 442 |
J | Headtube Length | 95 | 100 | 110 | 120 | 130 | 140 |
K | Top tube Length | 563 | 583 | 605 | 632 | 660 | 692 |
L | Seat Tube Angle | 76.5°|76° | 76.5°|76° | 76.5°|76° | 76.5°|76° | 76.5°|76° | 76.5°|76° |
M | Standover Height | 730 | 734 | 744 | 749 | 757 | 757 |
All measurements in degrees or millimetres |
Sizing Guide
The sizing chart is a great place to start when picking your next bike but everyone will fit a bike a bit differently. Your torso, arm, and leg lengths all play into what size of bike you may need. Plus, there's your own personal preference.
We always recommend swinging by the shop and taking the bike that you're looking for a spin to see how it feels. If you're unable to come by, looking at the geometry of your current bike and comparing it is a good place to start. If you have any further questions, our customer service team is there to help.
Size | Height | |
---|---|---|
Imperial | Metric | |
S1 | 4'11" - 5'3" | 150 - 160cm |
S2 | 5'2" - 5'8" | 157 - 173cm |
S3 | 5'5" - 5'11" | 165 - 180cm |
S4 | 5'8" - 6'2" | 173 - 188cm |
S5 | 5'10" - 6'4" | 178 - 193cm |
S6 | 6'2" - 6'8" | 188 - 203cm |