210000085329
The Turbo Levo Expert T-Type unleashes full trail potential with its powerful 2.2 motor, SRAM GX Eagle Transmission drivetrain, 700Wh battery, and RockShox Select Plus suspension—built to tackle tough trails with ease and precision.
Pickup currently unavailable at Steed Cycles
Pickup currently unavailable
969 Marine Drive
North Vancouver BC V7P 1S4
Canada
+16049872168
EMAIL: sales@steedcycles.com
PHONE: 604-987-2168
Wiring HarnessCustom Specialized wiring harness
ChargerCustom charger, 42V4A w/ Rosenberger plug, 100-240V
MotorSpecialized 2.2 Custom RX Trail Tuned Motor
BatterySpecialized M3-700, Integrated battery, 700Wh
UI/RemoteSpecialized MasterMind TCU, percentage of remaining charge, 120 possible display configurations, MicroTune assist adjustment, over-the-air updates, ANT+/Bluetooth®, w/Handlebar remote
FrameFACT 11m full carbon, 29" front wheel, 27.5" rear wheel, full internal cable routing, 148mm spacing, fully sealed cartridge bearings, 150mm of travel, geo adjust head tube, geo adjust horst pivot
ForkRockshox Zeb Select Plus, 29", S2-S6: 160mm, S1: 150mm
Rear ShockS2-S6: Rockshox Vivid Select Plus, 210x55mm, S1: Rockshox Deluxe Select Plus, 210x52.5mm
Front BrakeSRAM Maven Bronze, 220mm rotor, metallic pads
Rear BrakeSRAM Maven Bronze, 200mm rotor, metallic pads
CranksetPraxis forged M30, custom offset, 160mm
ChainSRAM GX Eagle Transmission Flattop Chain
ChainringsSRAM Eagle Transmission 34t Steel, 104BCD
CassetteSRAM GX Eagle Transmission Cassette, 12spd, 10-52t
Shift LeversSRAM AXS POD Controller
Rear DerailleurSRAM GX Eagle Transmission Derailleur
Front TireButcher, GRID GRAVITY casing, GRIPTON® T9 compound, 2Bliss Ready, 29x2.3"
Rear TireEliminator, GRID GRAVITY casing, GRIPTON® T9/T7 compound, 27.5x2.3"
Inner TubesStandard, Presta Valve
Front WheelTraverse Alloy 350, 29", 15x110mm
Rear WheelTraverse Alloy 350, 27.5", XD freehub body, 12x148mm
StemAlloy Trail Stem, 35mm bar bore
Handlebars6061 mtn bars, 35mm diameter, 8 degree back sweep, 6 degrees up sweep, 800mm width. S1/S2: 30mm rise, S3-S6: 40mm rise
SaddleSpecialized Bridge Comp with Mimic
SeatPostPNW Loam Dropper, S1: 125mm, S2: 150mm, S3: 170mm, S4-S6: 200mm
Seat BinderAlloy, 38.6mm
GripsSpecialized Trail Grips
SWATSWAT CC steerer tube integrated tool with chain tool and link
Weight23.04kg (50 lb, 12.7 oz) S4
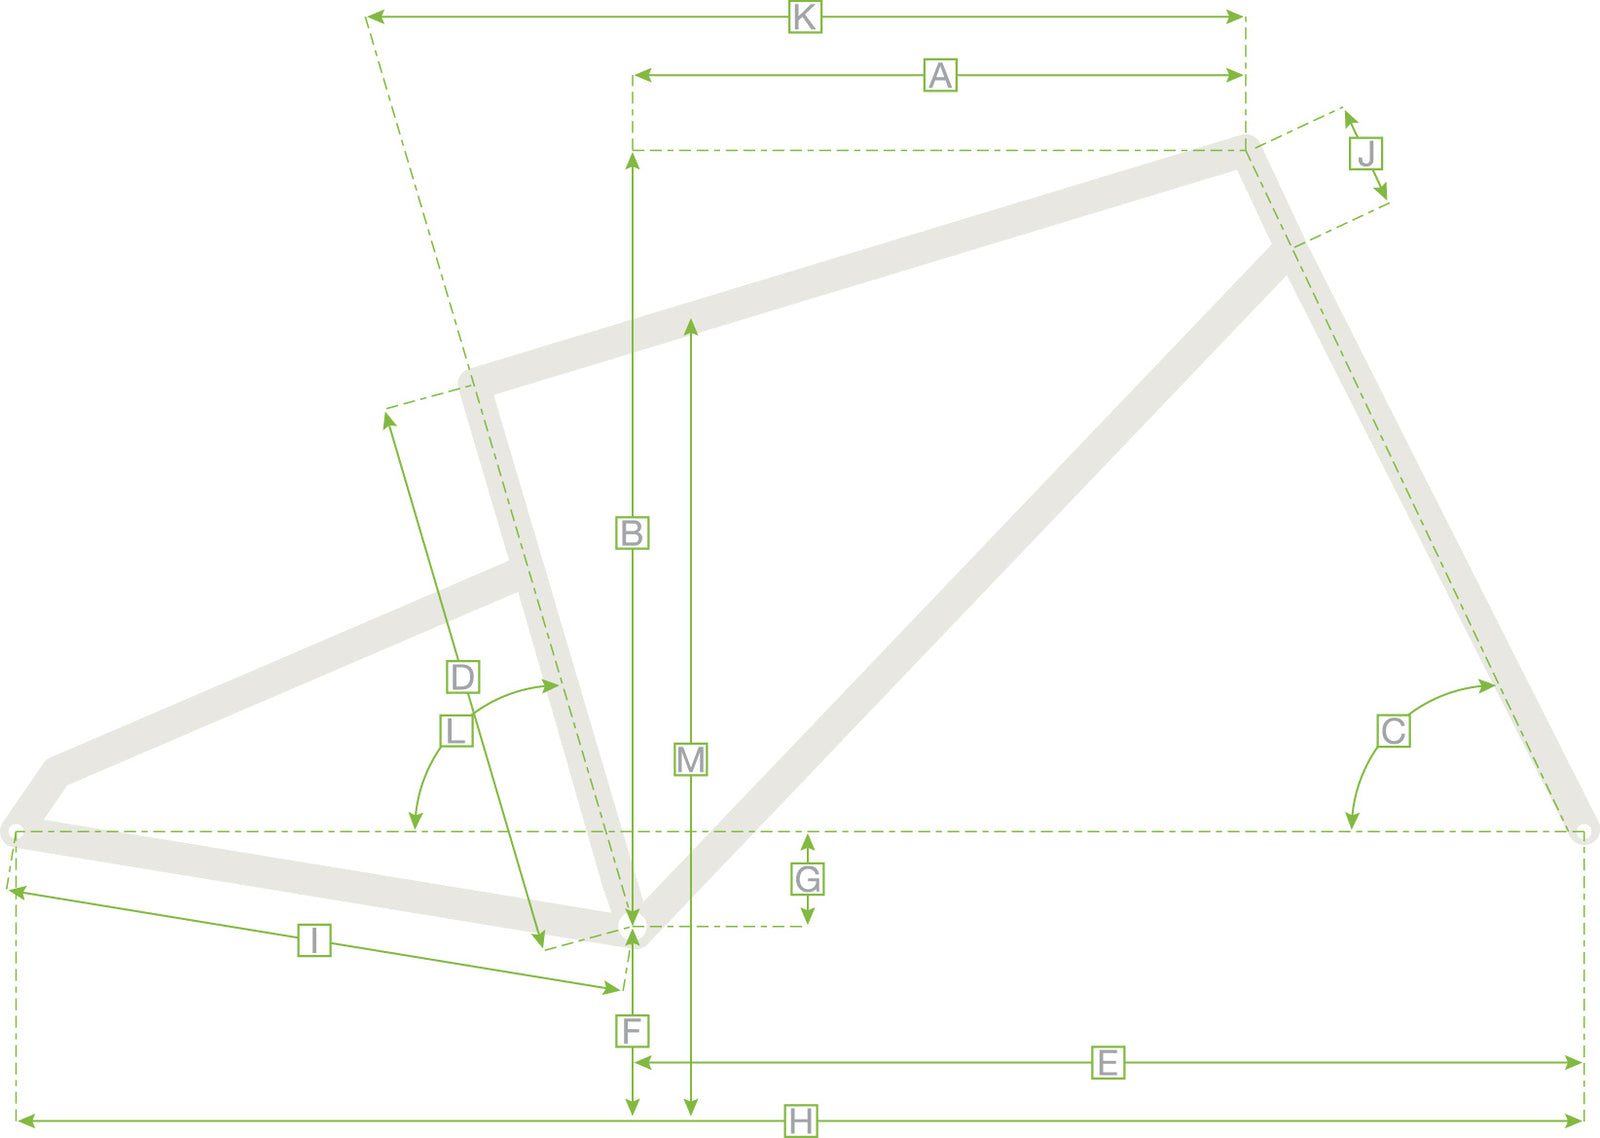
| S1 | S2 | S3 | S4 | S5 | S6 | ||
|---|---|---|---|---|---|---|---|
| A | Reach | 412 | 432 | 452 | 477 | 502 | 532 |
| B | Stack | 605 | 617 | 626 | 635 | 644 | 653 |
| C | Headtube Angle | 64.5° | 64.5° | 64.5° | 64.5° | 64.5° | 64.5° |
| D | Seat Tube Angle | 78° | 77.2° | 76.7° | 76.2° | 76.2° | 76.2° |
| E | Front Centre | 738 | 760 | 784 | 814 | 843 | 878 |
| F | Bottom Bracket Height | 352 | 350 | 350 | 350 | 350 | 350 |
| G | Bottom Bracket Drop | 25 | 27 | 27 | 27 | 27 | 27 |
| H | Wheelbase | 1179 | 1200 | 1225 | 1255 | 1284 | 1318 |
| I | Chainstay Length | 442 | 442 | 442 | 442 | 442 | 442 |
| J | Headtube Length | 105 | 105 | 115 | 125 | 135 | 145 |
| K | Seat Tube Length | 380 | 390 | 405 | 425 | 445 | 465 |
| L | Standover Height | 752 | 776 | 783 | 787 | 788 | 790 |
| All measurements in degrees or millimetres | |||||||
The sizing chart is a great place to start when picking your next bike but everyone will fit a bike a bit differently. Your torso, arm, and leg lengths all play into what size of bike you may need. Plus, there's your own personal preference.
We always recommend swinging by the shop and taking the bike that you're looking for a spin to see how it feels. If you're unable to come by, looking at the geometry of your current bike and comparing it is a good place to start. If you have any further questions, our customer service team is there to help.
| Size | Height | |
|---|---|---|
| Imperial | Metric | |
| S1 | 4'11" - 5'3" | 150 - 160cm |
| S2 | 5'2" - 5'8" | 157 - 173cm |
| S3 | 5'5" - 5'11" | 165 - 180cm |
| S4 | 5'8" - 6'2" | 173 - 188cm |
| S5 | 5'10" - 6'4" | 178 - 193cm |
| S6 | 6'2" - 6'8" | 188 - 203cm |
Steed Cycles is a full service bike shop. Shop online or in-store for bikes, parts, cycling accessories, clothing and more.
From basic safety checks to brake setting, to a complete rebuild, we are here to make all of your bike dreams come true.