Suspension setup, much like truing wheels, is often seen as a bit of a dark art, something that can only be performed by the most artisan of cycle technicians. In fact, this couldn't be further from the truth, and in all honesty, getting the basics of both of these skills down to the point where you can make a significant impact on the quality of your setup is actually relatively easy. As with anything though, both of these fields are veritable rabbit-holes of information and knowledge, and you can go as deep as you like!
Today however, I'm going to explain the basics of suspension set-up so that you too can get the most out of your bike with minimal effort!
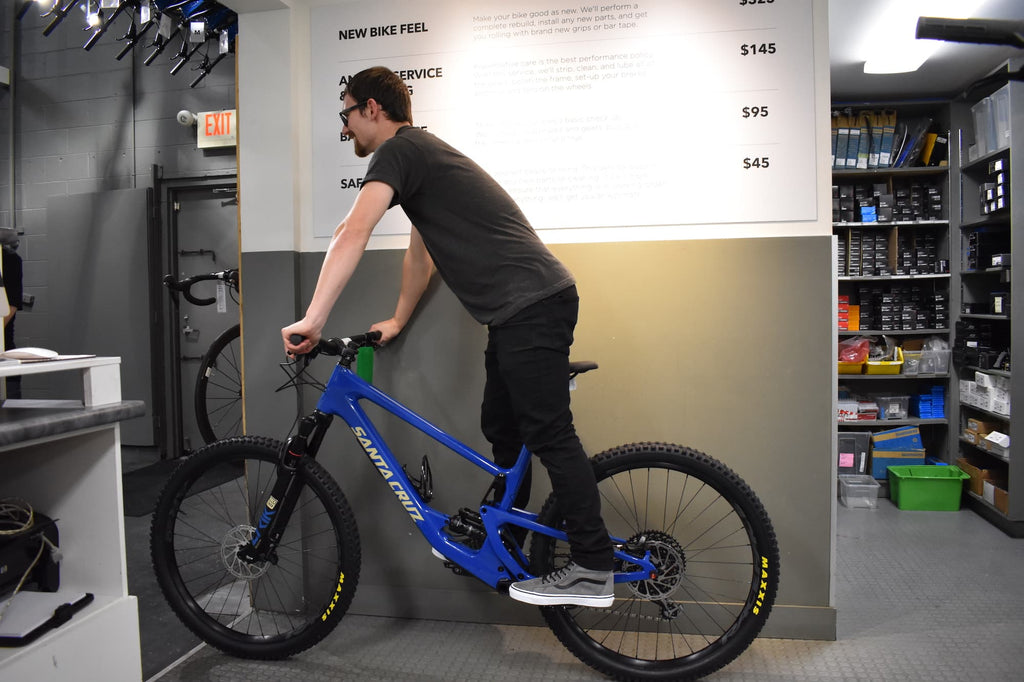
 It's important to get your suspension set up well so that you can feel comfortable on things like this!
Sag
Sag is where you want to start in setting your suspension up, and is arguably the most important part. If you get your sag wrong, you can't really compensate with anything else. Thankfully, setting sag is a relatively simple task so long as you have a shock pump (for most modern air suspension systems). Sag is also a fairly personal thing, however there is a workable window within which a rider's weight will sit, so we will focus on finding that window.
What is sag?
Sag is what it sounds like - it's the amount that your suspension sags when you sit on the bike, measured in either a percentage of the bike's total travel, or in millimetres. For most bikes, you want to be aiming at between 25-35% sag front and rear, however personal preference plays a large part. Different amounts of sag work better on different bikes too.
 A good starting point for your sag is at around 25-30% of your travel.
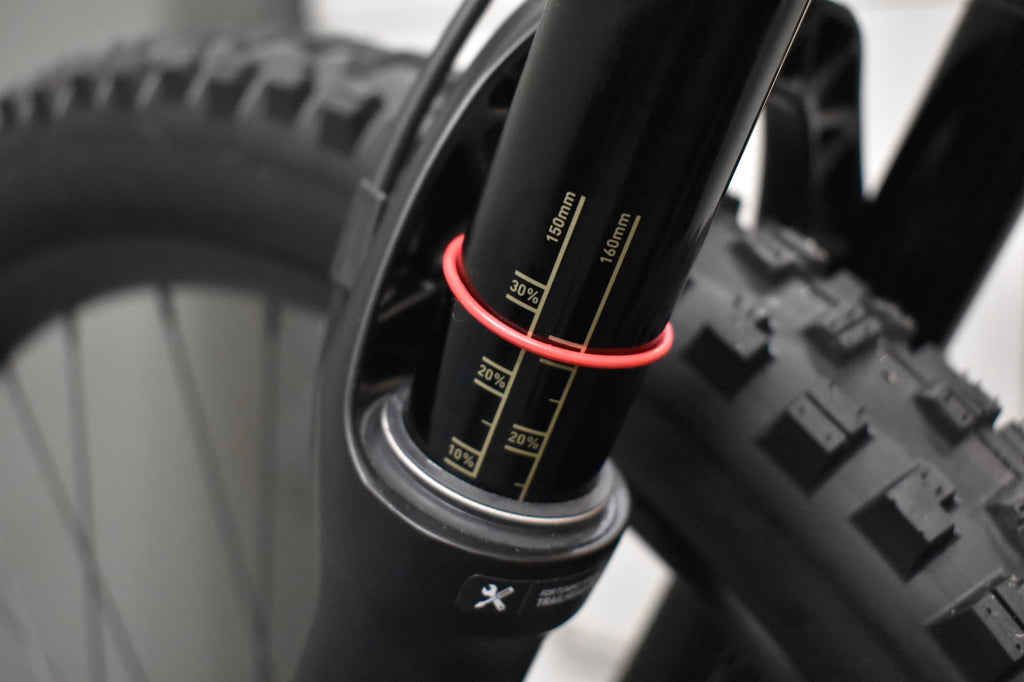
Most bikes will have a sag o-ring on the fork and shock to help measure sag, and some modern suspension will also have gradients marked on the fork or shock. Sag is measured as a percentage of the stroke of the fork or shock, so measure the total exposed length of shaft or if you know the travel of the fork (eg 160mm) calculate it as a percentage of this.
Most forks these days also have a chart on the lower leg to give you a base-line air pressure, just read off the recommended air pressure for your weight and use a shock pump (not a regular pump - these are usually too high volume and too low pressure) to fill it up. You should cycle the suspension a couple of times to equalise the pressure between the positive and negative chambers and then double check the pressure. Worth noting is Rockshox's Trailhead app - where you can input the serial number from your fork and your weight and the app will give you some recommended baseline settings. Many bike brands also have recommended rear shock pressures or a pressure calculator on their websites - such as Santa Cruz, Specialized, Trek etc. - use this in the same way. They also sometimes have rebound damping suggestions - we will talk about this later.
 Many modern suspension forks have an air pressure chart on the lower legs.
To set your sag manually, move your sag o-rings to the bottom of the travel, get on your bike and stand on the pedals in a neutral position leaning against a wall, or have a friend hold you up. Bounce your weight up and down on the bike a few times to get the suspension into its travel and then stop. Once it's settled, carefully move the sag o-rings to where the suspension is sitting (or have your friend do it) and carefully get off the bike so as not to disturb them. Measure the overall free stroke of the fork or shock (the exposed part of the shaft/stanchion), calculate your desired sag (30% is a good starting point) and note where the o-rings are in relation, and then add or remove air accordingly. This is a trial and error procedure, so you may need to do it a few times until you're right at that 30% sag mark
Sag is quite a personal thing, so you may find that you want to add or remove air after a few rides, and that's okay. It's worth having your own shock pump so you can experiment with this. It's worth noting that bottoming your suspension out isn't a bad thing, you should probably be doing it every now and then when riding at your best. Bottoming out constantly however is a sign that you may need to firm your suspension up. Likewise, never using all of your travel indicates that you might want to remove some air.
 Stand on the bike in a neutral position to set your static sag.
Damping
Damping is a complex thing and can be an absolute minefield of information, so I'm going to stay relatively light on this one. Damping slows down the rate at which you use your travel, and is quite important. Even with the damping all the way fast on your suspension, it still makes a considerable difference - with no damping your bike would feel like a pogo stick and is instantly noticeable and awful to ride because much like a pogo stick, the bike will bounce around all over the place rather than sticking to the trail.
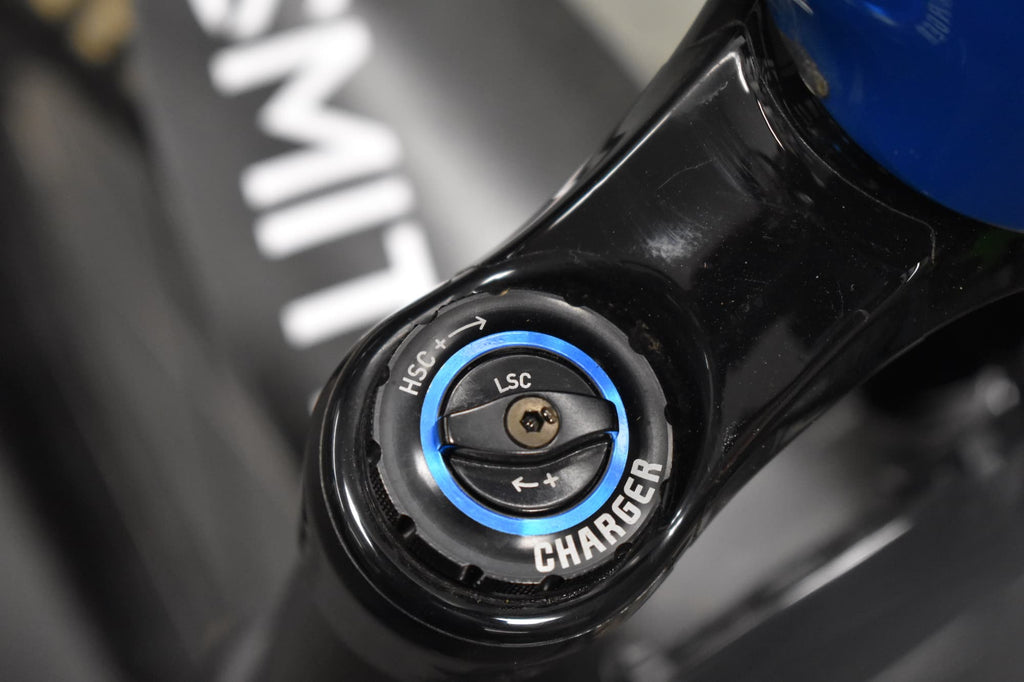 Here we have the damper top cap for a Rockshox Charger 2.1 damper with both high speed and low speed compression adjust.
On a suspension fork, the damper is usually located in the right hand leg of the fork, with the spring assembly in the left. Compression damping is usually adjusted at the top of the fork, and rebound at the bottom. A shock is just a single shaft with spring on the outside and damping in the middle and with damping oil stored in the piggyback.
Compression damping controls how fast you can compress your suspension, and rebound damping controls how fast it comes back. Compression damping can be categorised into high speed and low speed - where your low speed compression damping damps inputs from things like body movement, pedalling, pumping etc and to an extent, braking. High speed damping effects faster hits that come from the trail, so fast square-edge hits, drops etc. As an example, a lockout lever typically uses a low-speed compression damping circuit to control body inputs to the extreme.
Most suspension that only has one compression adjuster will be using low speed, with the high speed compression set internally. You can use the low speed compression to help keep the front end from diving under braking, controlling pedal inputs etc. - useful when climbing. You might use the high speed to keep from using all of your travel on bigger hits, if you're that kind of rider. Again, this is mostly personal preference and it's worth experimenting with.
 Here we have the rebound adjuster at the bottom right hand leg of a Fox fork.
Rebound damping as mentioned before often has a recommended setting based on your weight - the more air you have in the suspension, the quicker it wants to rebound, and so you need more damping. These suggestions are usually made from fully closed, so fully slow. Rebound damping is also personal and depends on the terrain you're riding and how you ride. Rebound too fast could result in your bike bucking you as it extends going over a jump, or your wheels washing out as they're not gripping properly. Rebound too slow can result in it packing down as your suspension is unable to extend back again fast enough when riding over rough terrain. There is a good middle ground, and that can take some finding, but you'll develop a feel for where you like it and how it should feel.
Volume Spacers (Tokens)
Volume spacers, also known as tokens are used for tuning your air volume and are a relatively recent development in bike suspension. They're also a very simple one. As air suspension compresses, the spring rate ramps up as the air is pushed into a smaller and smaller space, meaning that it's more resistant to compression the further through its travel it is. By reducing the air volume, you can tune the point at which it ramps up - a smaller air volume will ramp up faster, and a larger one will ramp up slower. If you find that you bottom your suspension out a lot but like the initial suppleness, you could add a volume spacer (or spacers) to make the suspension more progressive and resist bottoming out. If you find that you don't use all your travel, but like the initial stroke, you could try taking spacers out - many forks and shocks come with spacers pre-installed.
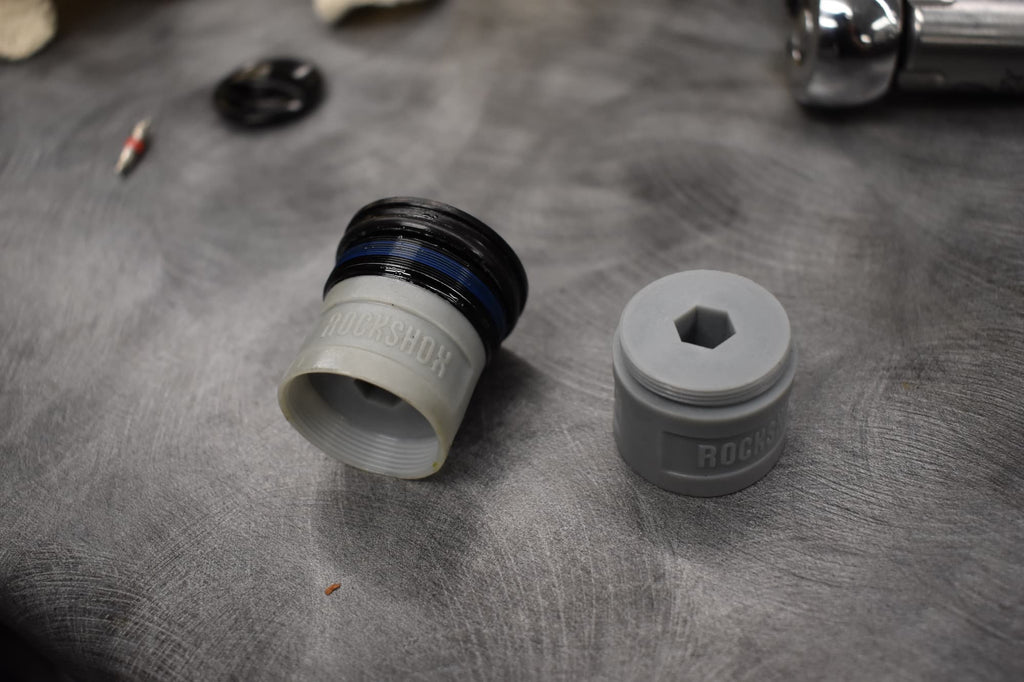 Many Rockshox forks come with volume spacers pre-installed
Some forks and shocks also come with a tuneable negative chamber - this essentially helps pull the suspension into its travel, so you can tune how supple it is off the top. An example of this is the Rockshox MegNeg - an aftermarket air can for your Super Deluxe rear shock that both decreases the positive chamber and increases the negative dramatically, resulting in both a supple initial stroke, and a BIG ramp up, this is a pretty extreme example though.
 There are many different volume spacers for many different forks and/or shocks, so make sure you have the right ones!
Hopefully this guide gave you some ideas on setting up your suspension and helped to explain the jargon. As always, come and speak to us if you need any help setting your suspension up and we should be able to get you off to a good start!